Save to Pinterest
 The first time I made these peanut butter eggs with a pretzel crust, I wasn't even aiming for an Easter treat. I'd found a half-full bag of pretzels and a jar of peanut butter while foraging for something to satisfy my sweet tooth, and decided to experiment. The satisfying crunch of the crust, the creamy filling, and the snap of chocolate instantly won me over. Making them always fills the kitchen with the smell of melting chocolate—something I never get tired of. They've become my casual go-to when I want something a little indulgent but still quick to assemble.
I once made a double batch for a spring picnic, and two cups mysteriously went missing before we even left the house. My little cousin confessed, chocolate smearing his grin, that he just couldn't resist the smell. Watching friends bite into the layers always reminds me how something simple can still wow a crowd. These peanut butter eggs quickly became the star that afternoon. We ended up sharing the recipe right on the grass, scribbled onto a napkin.
Ingredients
- Salted pretzels, finely crushed: Choose pretzels that are crunchy and fresh for the crust; crushing them lightly by hand leaves some nice chunky pieces.
- Unsalted butter, melted: Using unsalted butter gives you control over the saltiness so the pretzels shine.
- Granulated sugar: A little bit sweetens the salty crust and helps it stick together.
- Creamy peanut butter: Always opt for creamy for a smoother, more nostalgic filling, but crunchy works for texture lovers.
- Unsalted butter, softened: Room temperature butter blends easily with peanut butter for a creamy layer.
- Powdered sugar: Sifts in effortlessly, providing sweetness and structure to the filling.
- Pure vanilla extract: Just half a teaspoon lifts the filling with a subtle aroma.
- Semi-sweet chocolate chips: These melt smoothly and give just the right balance; dark chocolate adds drama if you prefer.
- Coconut oil or vegetable oil: This is the trick for a glossy, easy-to-bite chocolate topping.
- Optional: Colored sprinkles or flaky sea salt: I like to alternate between sea salt for grown-ups and sprinkles for kids.
Tired of Takeout? 🥡
Get 10 meals you can make faster than delivery arrives. Seriously.
One email. No spam. Unsubscribe anytime.
Instructions
- Prep Your Pan:
- Line each slot in your mini muffin tin with paper—don’t forget, or the cups get stuck. This sets you up for easy removal later.
- Mix Up The Crust:
- In a mixing bowl, toss together the crushed pretzels, melted butter, and sugar until everything glistens. The scent is instantly salty-sweet.
- Press And Set:
- Spoon a tablespoon of pretzel mixture into each liner, pressing firmly with a spoon or thumbs. Make sure it’s solid—soft spots can fall apart.
- Chill The Crust:
- Freeze the tin for 10 minutes so the crust sets hard. It makes the next layer go on smoother.
- Whip The Filling:
- While crust chills, blend peanut butter, softened butter, powdered sugar, and vanilla until creamy. It should be thick but not stiff, and the aroma is irresistible.
- Layer The Filling:
- Scoop a rounded tablespoon of peanut butter filling onto each chilled crust, smoothing gently. Try not to overfill or the layers mix.
- Melt The Chocolate:
- Microwave chocolate chips with coconut oil in 30-second bursts, stirring well. You want it glossy and liquid, not scorched.
- Top With Chocolate:
- Spoon melted chocolate over each cup, covering the peanut butter fully. The warmth lets it flow, sealing all the layers.
- Decorate and Set:
- If you’re feeling festive, sprinkle colored sprinkles or flaky sea salt on top. Chill in the fridge for at least 30 minutes—waiting is the toughest part.
- Serve and Store:
- Once set, keep cups cool in the fridge until ready to serve. They stay perfect for up to five days.
 Save to Pinterest
 When my friends tried these at my birthday gathering, a spontaneous round of applause broke out. I realized these peanut butter eggs were more than just dessert—they sparked laughter and conversation, and everyone felt special. Now, making them has become a ritual before every celebration.
Getting That Crunch Just Right
I found that the trick to the perfect crust is not crushing pretzels too fine. Leaving a few bigger pieces gives you that satisfying snap when you bite in—like the bottom of a really good cheesecake. Butter mixed while still warm makes the crust hold together, but don't leave it sitting long or it stiffens too much.
Peanut Butter Layer Secrets
Sometimes the filling felt a little too thick, so I started blending an extra teaspoon of vanilla. It adds aroma and softness. Don't rush this stage—the smoother the filling, the prettier the final cup.
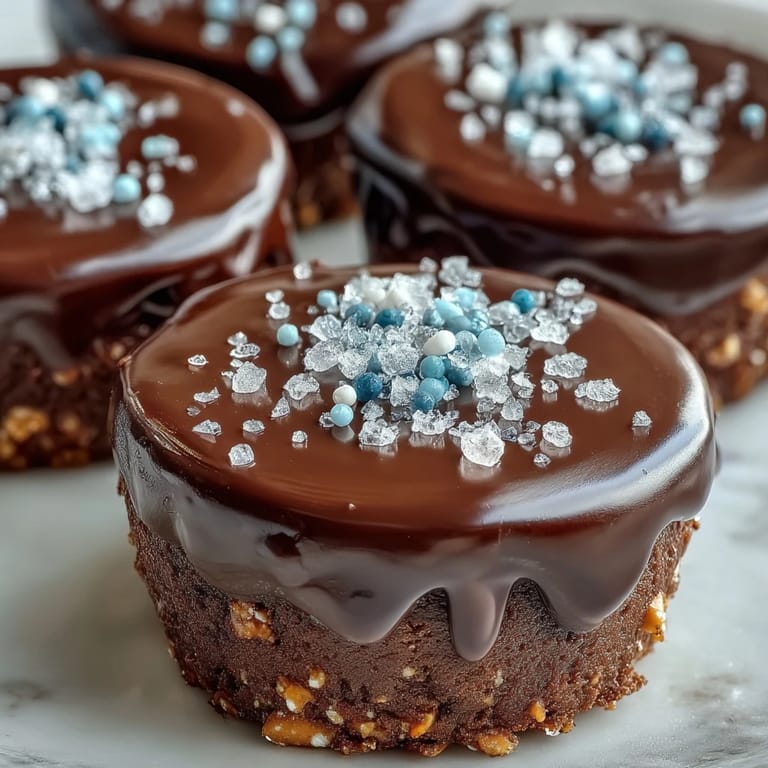
Chocolate Topping Tips and Decorations
Timing the chocolate melt just right is key. If you overheat, it scorches and becomes grainy, so always stir every 30 seconds. Thin with coconut oil for shine and easy spreading.
- Top with sea salt right away so it sticks.
- Sprinkles are fun, but flaky salt brings depth.
- Don't stack the cups until they're fully set or you risk smudging the chocolate.
 Save to Pinterest
 Every batch of these peanut butter eggs feels like a mini celebration. Enjoy sharing them—there's always someone who will ask for the recipe!
Recipe FAQs
- → Can I use a different nut butter?
Yes, substitute almond or sunflower seed butter for a nut-free or alternative flavor twist.
- → What type of chocolate works best?
Semi-sweet chocolate chips are ideal, but dark or milk chocolate can also be used for added richness.
- → How can I make these gluten-free?
Use gluten-free pretzels to create a wheat-free version while maintaining the crunchy crust.
- → What decorations can I add?
Colored sprinkles or flaky sea salt add visual appeal and extra flavor to these chocolate cups.
- → How far in advance can I prepare them?
These cups stay fresh for up to 5 days when stored in the refrigerator, making them perfect for prepping ahead.
- → Are these vegetarian?
Yes, all ingredients used are vegetarian-friendly.